Fields
Fields are place holders in items for inserting values.
Fields Exercise
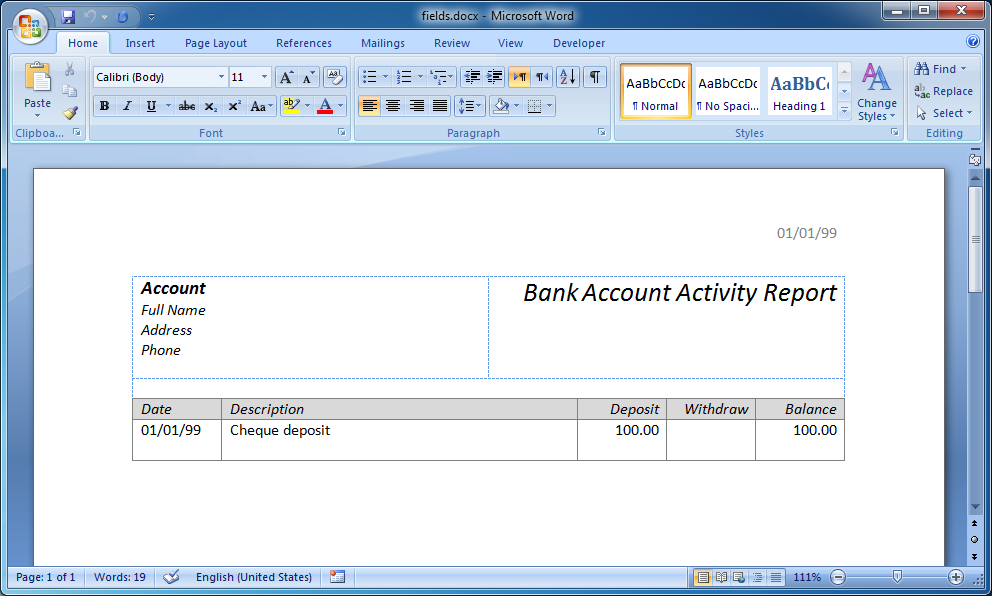
Open fields.docx in the DocxFactory/exercises/templates/ directory (see picture below).

To add fields, type the field name in squiggly brackets. You can also add an optional format after the field name separated by a space. For example: “{MyNumber #,##0.00}”.
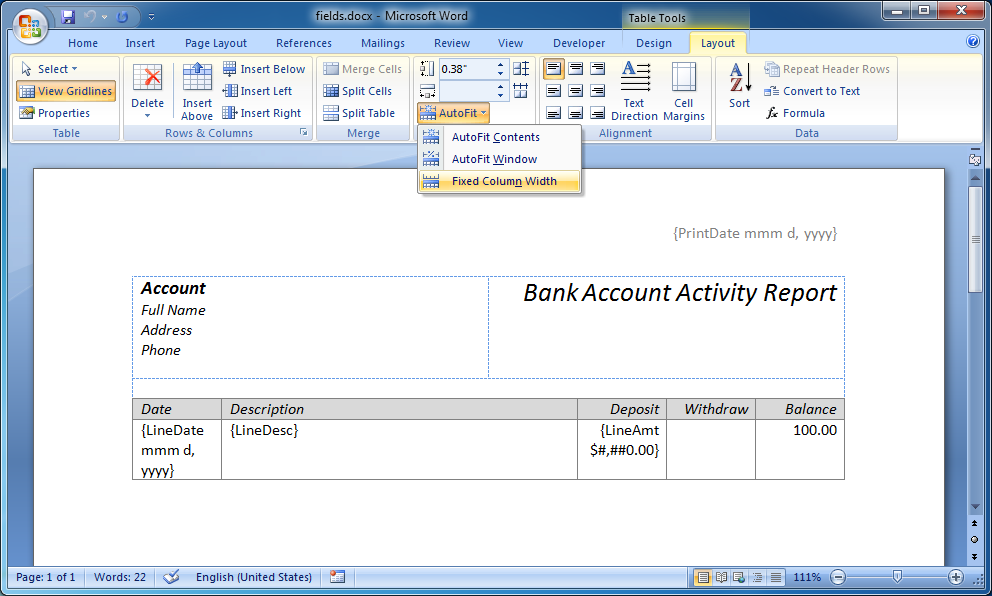
Add the fields below to your template (see picture below):
{LineDate MMM d, yyyy} in the Date column.
{LineDesc} in the Description column.
{LineAmt $#,##0.00} in the Deposit column.
{PrintDate MMM d, yyyy} in the header of the document.

Note: The same field name can be used more than once in the same document and even in the same item. When setting the field values, if there is more than one field with the specified field name then all the fields with that name are set.
Note: If your fields do not fit in the table columns and you do not want the columns width to change while you are designing your template then you can select Fixed Column Width in the AutoFit menu in the Layout ribbon (see picture above).
Note: If you want to use squiggly brackets in your template then escape the brackets by entering double brackets (“{{“ or “}}”). The brackets will show up only once in the created .DOCX file.
There are 3 basic field types. The field type is decided according to the field format entered in the template.
Text Format
Text fields have no format and are the default field type if no format is entered.
Note: At the moment, text fields have no format but text field format is planned to be added in future versions of DocxFactory.
Number Format
Number fields use the Microsoft Excel number formats.
For example:
$#,##0.00
#0%
[GREEN]#,##0.0#;[RED]-#,##0.0#;-
In the template the number format should always be entered using the American number format (using a comma “,” for the thousands separator and a dot “.” for the decimal point). In the created .DOCX file the number values are displayed in the current DocxFactory number format. This approach allows for sharing templates created in different countries with different number formats.
Note: You can also enter colors using the six digits hexadecimal format prefixed with a #. For example: “[#FF00FF]”.
Datetime Format
Like number formats, datetime formats also use the Microsoft Excel datetime formats.
For example:
MMM d, yyyy
[h]:mm:ss.sss AM/PM
MM/dd/yyyy hh:mm:ss
In the template you can also enter a “99/99/99” or “99/99/9999” in the date format. In the created .DOCX file the day, month and year places in the date value are displayed according to the current DocxFactory date format.
Note: You can also escape characters that are used by any of the formats using the “\” sign. For example: “\M\D\Y MMM d, yyyy”.
Note: You can also use comments in your field definition using the C/C++ multiline comment syntax. For example: “{MyField /*MMM d, yyyy*/ 99/99/99}”.
Compile the template.
Create the .DOCX file.
Copy and run the code below.
from docxfactory import WordProcessingMerger from datetime import datetime try: merger = WordProcessingMerger.get_instance() // DocxFactory default input codepage is UTF8. // Use set_code_page() to change the codepage. // merger.set_code_page("ISO8859-1") start_time = datetime.now() merger.load("/opt/DocxFactory/exercises/templates/fields.dfw") merger.set_clipboard_value("_header", "PrintDate", start_time) merger.paste("Account") for i in range(3): merger.set_clipboard_value("Line", "LineDate", start_time) merger.set_clipboard_value("Line", "LineAmt", i) merger.set_clipboard_value("Line", "LineDesc", "Desc" + str(i)) merger.paste("Line") merger.save("/tmp/fields.docx") print("Completed (in", round((datetime.now() - start_time).total_seconds(), 3), "seconds).") exception Exception as e: print(str(e)) |
The code sets the field values of an item in the clipboard and pastes the item, copying the item with the set field values to the new document. Because of that, field values must be set before the item is pasted otherwise if the item is pasted before the values are set then the item will be pasted with empty values to the new document. Every time after a paste method is run all the fields in the clipboard are automatically cleared so you would not need to clear old values manually.
The code sets the values for all the basic field types:
Text fields are set with a string value.
Number fields are set with a number value.
Datetime fields are set with a datetime value.
In addition, the PrintDate field in the header of the document is set. The “_Header” item name is used to refer to fields that are both in the header or footer of the document. The same item name is used to refer to both the header and footer to help separate between the design and code. For example: If you move a field in the header to the footer in your template then no changes in your code will be required. Unlike regular items, the header and footer do not need to be pasted and are always part of the document.
The code introduces the set_clipboard_value method in the WordProcessingMerger singleton (see details below).
docxFactory.WordProcessingMerger.set_clipboard_value Method
Sets the field value of an item in the DocxFactory clipboard.
Definition:
def set_clipboard_value(item_name, field_name, field_value):
Parameters:
item_name - Item name.
field_name - Field name.
field_value - Number, string, datetime, date or time value.
Notes:
The item names are not case sensitive. For example: “Account” and “account” refer to the same item.
The field names are not case sensitive. For example: “LineDate” and “linedate” refer to the same field.
If there is more than one field with the specified field name then all the fields with that name are set.
If the item name is not specified (“”) then the fields anywhere in the document with the specified field name are set. It is recommended to specify an item name to avoid setting unintended fields.
Use the “_Header” item name to refer to items that are in the header or footer of the document.
If a text field is set with a number value then the number value is converted to a string value using the current DocxFactory number format.
If a number field is set with a string value then the string value is converted to a number value using the current DocxFactory number format.
Datetime fields can be set with a string value of ISO datetime or just a date string in the current DocxFactory date format or just a time string.
For example:
1999-12-31T23:59:59.123+11:30 (“T” can be replaced with a blank “ “)
1999-12-31T23:59:59
1999-12-31
31/12/1999
31/12/99
23:59:59.999
23:59:59
Datetime fields can also be set with a numeric value of UNIX time (seconds from 1/1/1970 at 00:00:00). Fractions of a second values are also supported.
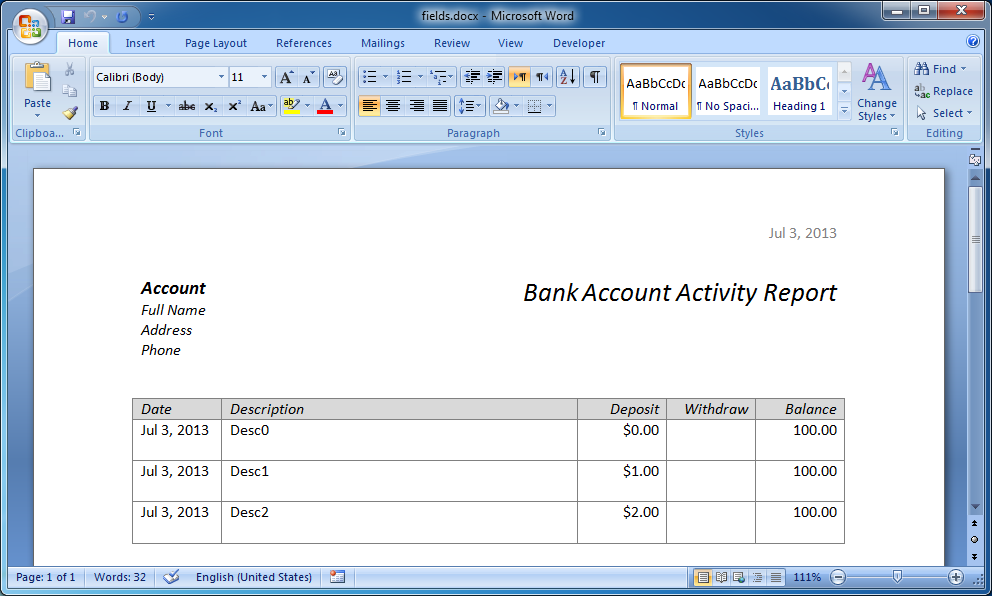
Open the created .DOCX file (see picture below).
The code in this exercise contains all the main components for creating a .DOCX file: create a new document from a template, set field values, paste items and save the .DOCX file. As you can see, there are only 4 main methods needed to create a .DOCX file.
 |