Windows Installation
This chapter shows you how to install and setup DocxFactory on Windows.
Go to www.docxfactory.com and download the Windows installation .ZIP file.
For the Windows 32bit Progress Client download DocxFactoryWin32.zip.
For the Windows 64bit Progress Client download DocxFactoryWin64.zip.
Extract the DocxFactory\ directory into the Program Files\ directory.
The DocxFactoryWin32.zip is extracted to the C:\Program Files (x86)\ directory.
The DocxFactoryWin64.zip is extracted to the C:\Program Files\ directory.
Note: If there is an older version installed then delete the DocxFactory directory first (do not overwrite it). You may need to shutdown all processes using the DocxFactory.dll or the file will be locked and undeletable.
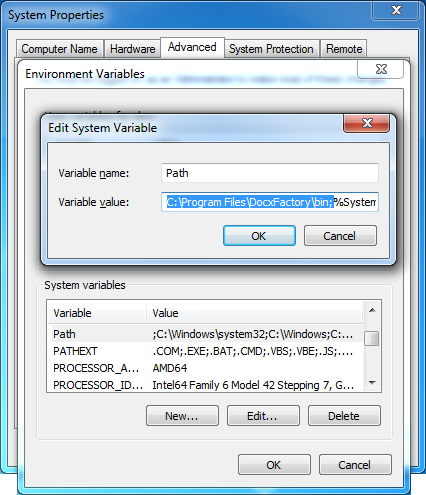
Add the DocxFactory\bin\ directory to the Windows PATH used to search for executables and libraries when a program is run.
Right click My Computer and click Properties.
In the System Properties window, click on the Advanced tab.
In the Advanced section, click the Environment Variables button.
In the Environment Variables dialog box, select the PATH variable in the Systems Variable section, click the Edit button and add to the PATH the “C:\Program Files\DocxFactory\bin;” directory with a semicolon to separate it from the other directories (see picture below).

Note: You will need to restart all processes that use the DocxFactory.dll, like, the Progress runtime, AppServer/WebSpeed, Admin Service etc. (or simply restart the Computer) for the changes in the PATH environment variable to take effect.
Add the DocxFactory\progress\ directory to the client PROPATH.
Compile all the programs in the DocxFactory\progress\ directory and its sub directories (possibly using the ADE Application Compiler).