Special Fields
Besides the basic fields there are additional special fields:
Picture fields to insert pictures.
Barcode fields to insert text values displayed as barcodes. DocxFactory supports an extensive list of 1D and 2D barcodes including Code39, Code128, EAN, UPC, ISBN, Databar, Postal Codes, PDF417, Data Matrix, QR Code, Maxi Code and many more.
HTML/RTF fields to insert HTML or RTF values instead of plain text that can be used to add a little formatting like fonts, bolding, colors etc. all the way up to inserting mini documents with numbered or bullet lists, tables etc.
Boolean fields which are a cross between fields and items. Boolean fields have items for yes and no values (which just like regular items can have text, pictures etc.). When setting the field value, the appropriate item for that value is pasted.
Special Fields Exercise
Open special_fields.docx in the DocxFactory/exercises/templates/ directory (see picture below).
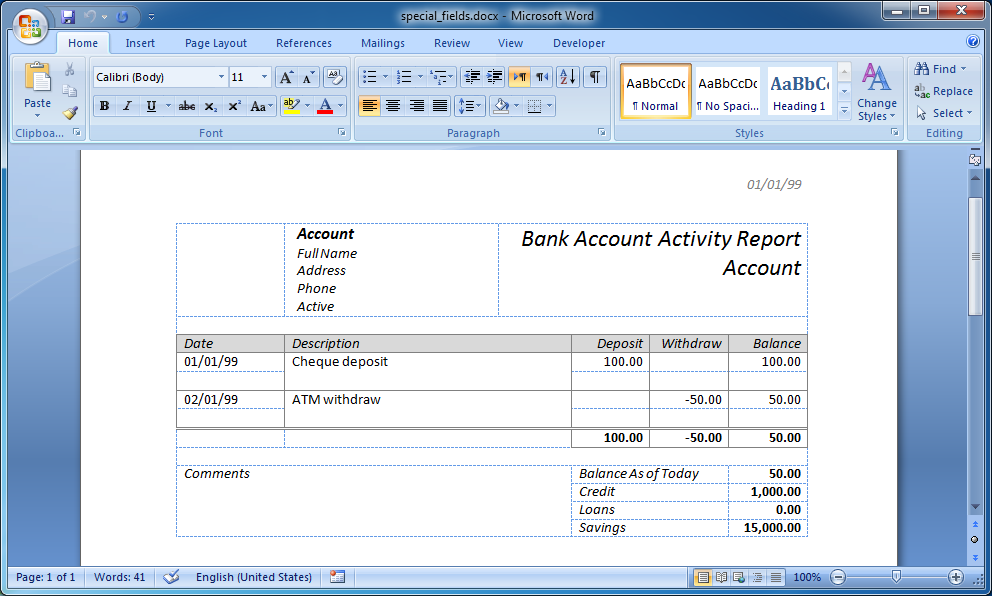
To add a picture field, first insert a picture to the template. The picture acts as a place holder that will be replaced with your pictures when creating a new document.
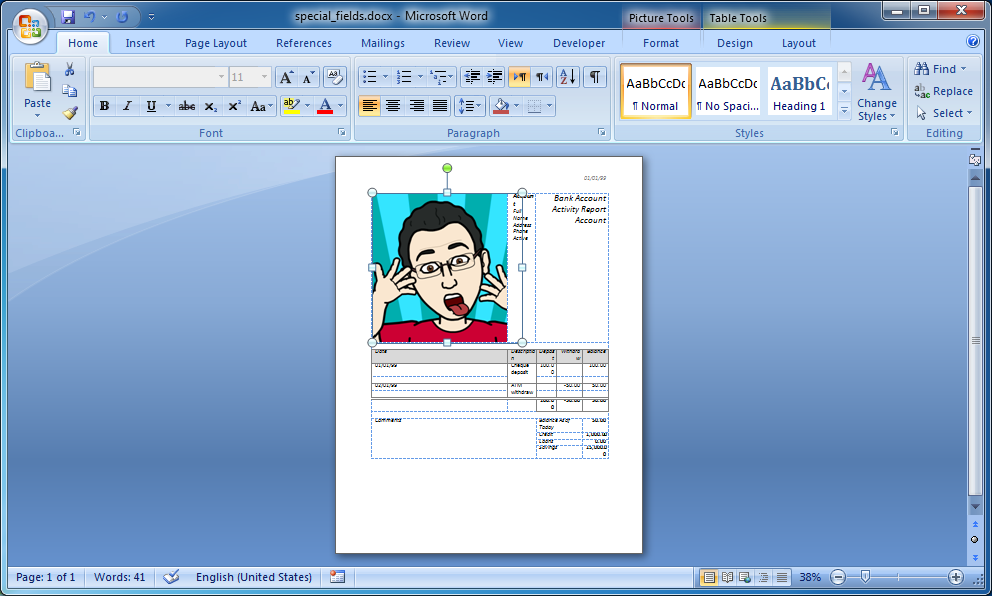
First click in the box in the top left corner of the document to place the cursor in the box. Then select Picture in the Insert ribbon and choose customer0.png from the DocxFactory/images/ directory (see picture below).
 |
Size the picture.
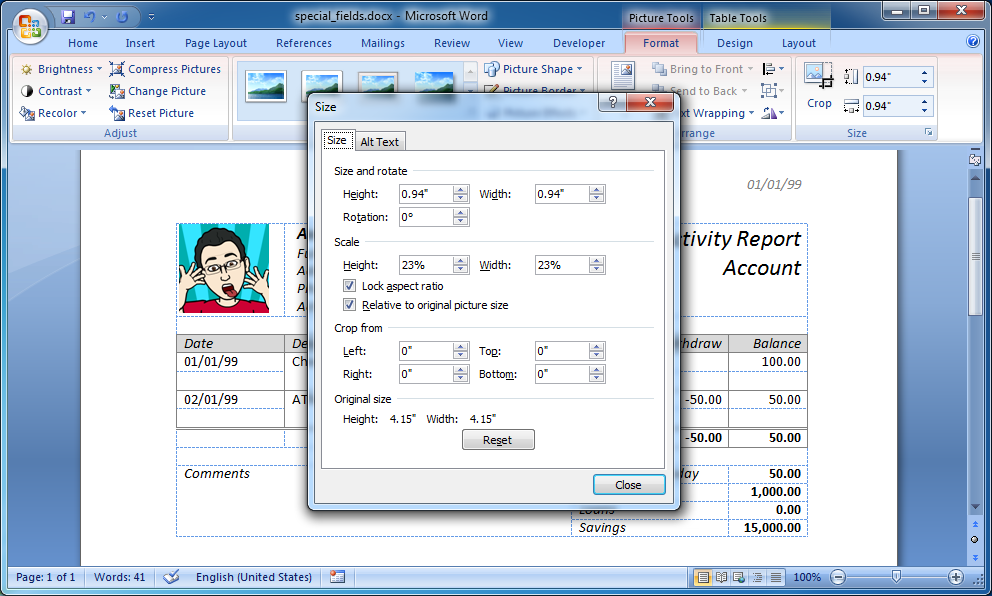
Right click the picture and select Size from the drop down menu. In the size dialog box make sure the Lock Aspect Ratio is selected, enter 0.94" in the height and press the Close button (see picture below).
 |
Enter the picture field name and optional formatting.
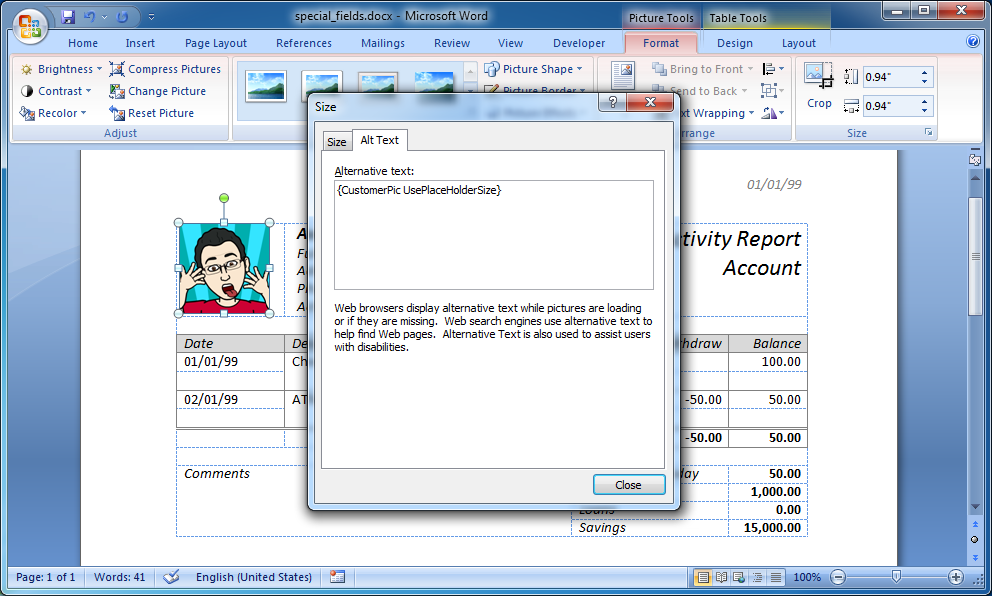
If you are using Microsoft Word 2007 then right click the picture and select Size from the drop down menu. Select the Alt Text tab in the Size dialog box and enter “{CustomerPic UsePlaceHolderSize}” in the Alternative text box (see picture below).
If you are using Microsoft Word 2010 then right click the picture and select Format Picture from the drop down menu. Select Alt Text from the menu and enter the field name and optional formatting in the Description box.
Add a border around the place holder image.
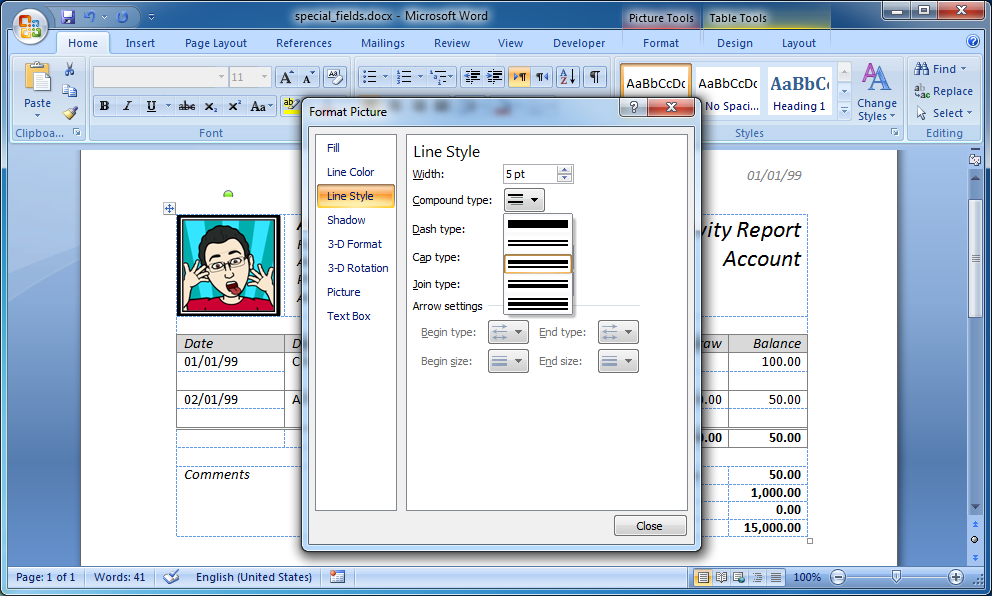
Right click the picture and select Format Picture. In the Format Picture dialog box, select the Line Style category, select the third option from the Compound type combo box, enter 5pt Width and close the dialog box (see picture below).
To add a barcode field, enter the field name, the barcode type and any other barcode optional formatting in squiggly brackets just like adding a basic field.
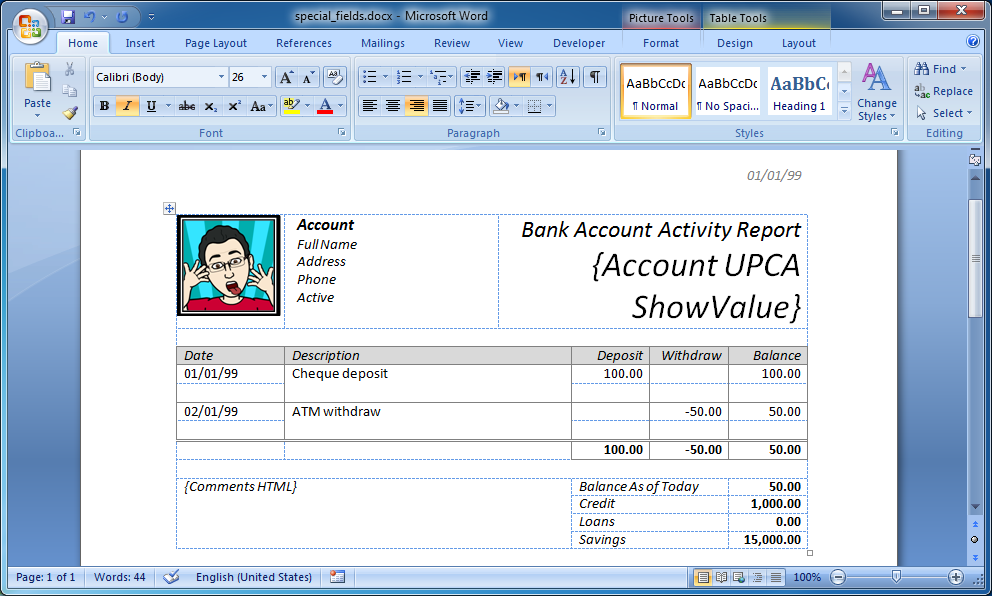
Replace the Account under Bank Account Activity Report with “{Account UPCA ShowValue}” and increase the font size to 26 (see picture below).
To add an HTML/RTF field, enter the field name and “HTML” or “RTF” in the optional formatting in squiggly brackets just like adding a basic field.
Replace the Comments at the bottom of the document with “{Comments HTML}” (see picture below).
The HTML tag styles like fonts, colors etc. are taken from document named styles for similar parts (in the Styles group in the Home ribbon). For example: “<h1>” tag uses the Heading 1 style, “<p>” tag uses the Normal style and “<strong>” tag uses the Strong style. Just like in HTML, tag styles can also be combined. For example: “<p><strong></strong></p>” combines the Normal and Strong styles.
You can also create your own named style and apply it to an HTML tag by setting the class property to the style name. For example: create a style named MyStyle and insert the HTML “<p class="mystyle"></p>” (note that the HTML class must be in lowercase). Although HTML can also be styled with CSS styles combined in the HTML it is recommended to insert plain HTML in the program and manage the HTML styles using named styles in the template to help keep the data and design separate.
The inserted HTML/RTF values are like paragraphs which have a line break before and after them and cannot be inserted in the middle of a line.
To add a boolean field, create items for the boolean field values:
|
|
|---|---|
|
|
|
|
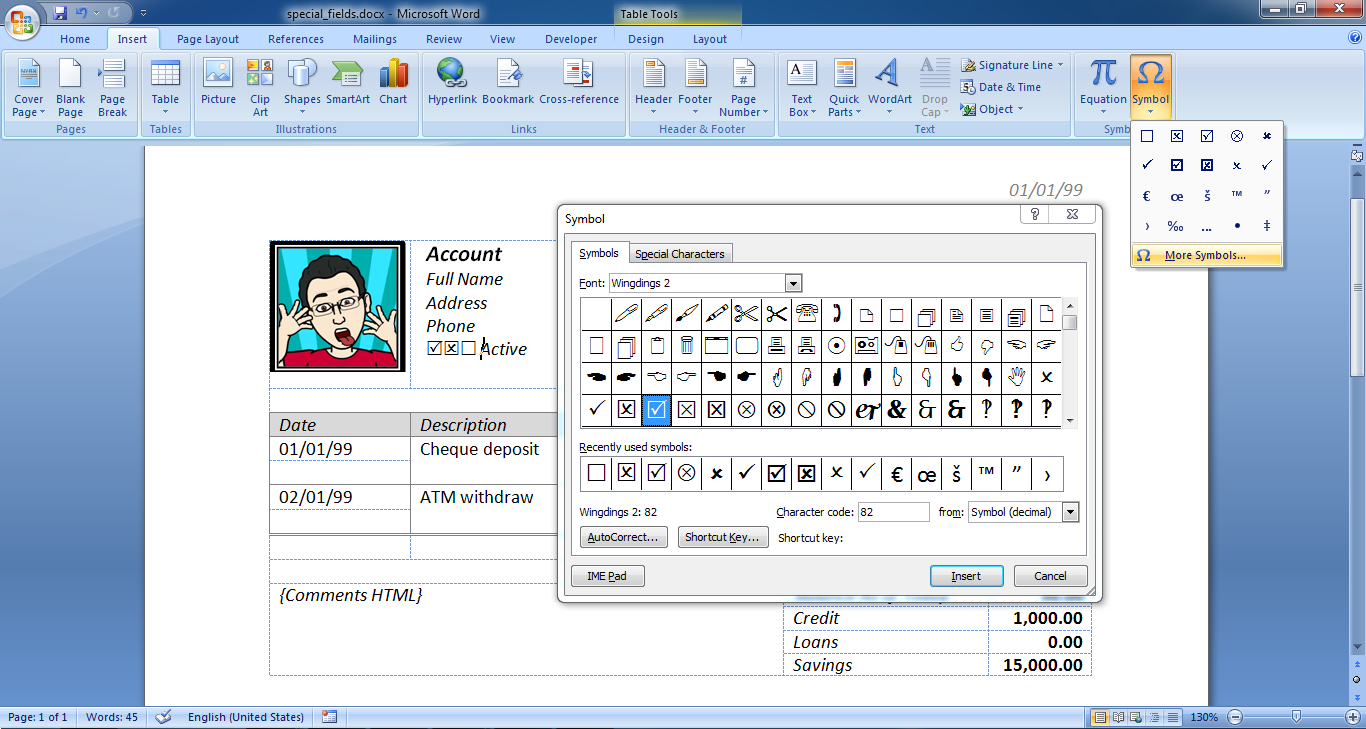
First, select More Symbols from the Symbol drop down menu in the Insert ribbon. Make sure the “Windings 2” font is selected and insert the symbols: “”, “” and “” before the “Active” text and deselect the Italicize (see picture below).
 |
Then create the items below (see picture below):
|
|
|---|---|
|
|
|
|
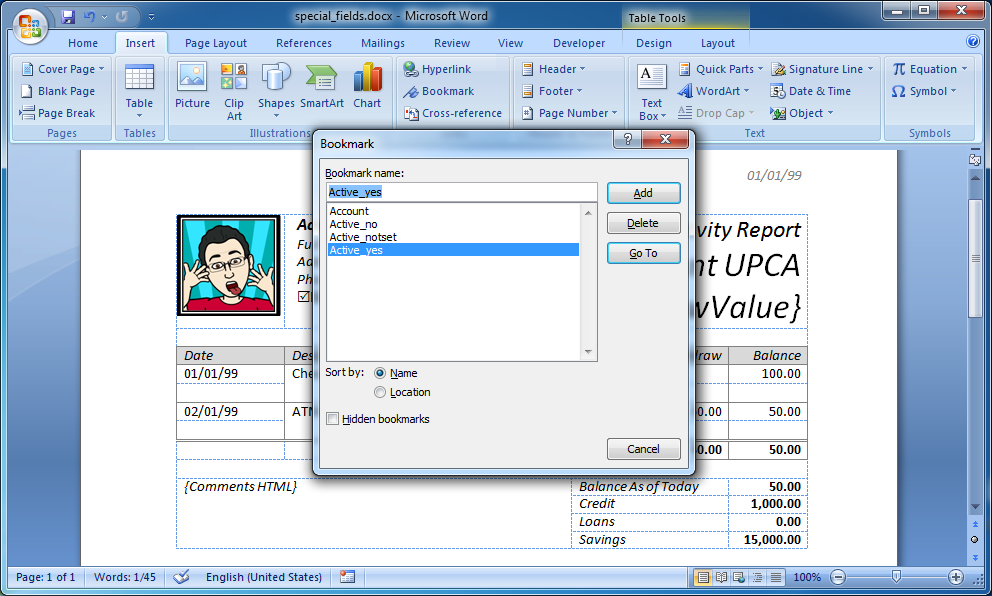 |
Note: All the items for the boolean field values are optional. If there is no item for the set field value then no item is pasted.
Note: The field name and value in the boolean field item names are not case sensitive. For example: “MyField_Yes” and “myfield_yes” refer to the same field name and value.
Just like basic fields, special fields also have optional formatting.
Picture Format
|
|
|---|---|
|
|
|
|
|
|
Barcode Format
| |
|---|---|
Code11 |
|
Code25 |
|
Code25IATA |
|
Code25Inter |
|
Code25Logic |
|
Code25Ind |
|
ITF14 |
|
Code39 |
|
Code39Ext |
|
Code93 |
|
PZN |
|
LOGMARS |
|
Code32 |
|
Code128 |
|
Code128B |
|
EAN128 |
|
EAN14 |
|
NVE18 |
|
UPCA |
|
UPCE |
|
EAN |
|
ISBN |
|
Codabar |
|
Pharma |
|
Pharma2Track |
|
Plessey |
|
MSIPlessey |
|
Telepen |
|
TelepenNum |
|
RSS14 |
|
RSS14Stack |
|
RSS14StackOmni |
|
RSSLtd |
|
RSSExp |
|
RSSExpStack |
|
Channel |
|
FIM |
|
Flat |
|
DAFT |
|
PostNet |
|
PLANET |
|
OneCode |
|
RM4SCC |
|
DPLeit |
|
DPIdent |
|
AUSPost |
|
AUSReply |
|
AUSRoute |
|
AUSRedirect |
|
KIX |
|
JapanPost |
|
KoreaPost |
|
Code16K |
|
Code49 |
|
PDF417 |
|
PDF417Trunc |
|
MicroPDF |
|
DataMatrix |
|
QRCode |
|
MicroQR |
|
MaxiCode |
|
Aztec |
|
AzRune |
|
CodeOne |
|
GridMatrix |
|
HIBCCode39 |
|
HIBCCode128 |
|
HIBCPDF417 |
|
HIBCMicroPDF |
|
HIBCDataMatrix |
|
HIBCQRCode |
|
HIBCAztec |
|
CCEAN |
|
CCEAN128 |
|
CCUPCA |
|
CCUPCE |
|
CCRSS14 |
|
CCRSS14Stack |
|
CCRSS14StackOmni |
|
CCRSSLtd |
|
CCRSSExp |
|
CCRSSExpStack |
|
|
|
|
|
|
|
|
|
|
|
|
|
|
|
|
|
|
|
|
|
|
|
|
|
Barcode Specific Formats
Code39 and Code39Ext
|
|
UPCA, UPCE, EAN, ISBN and CCEAN
Note: An EAN2 or EAN5 barcode can be added to the right of the barcode by adding “+<value>” with the EAN value to the barcode value. For example: “1234567890+12345”.
MSIPlessey
|
|
RSSExp
Notes: GS1 Application Identifiers (AIs) should be entered using [square brackets] notation. These will be converted to (round brackets) when the value is shown.
RSSExpStack and CCRSSExpStack
|
|
Notes: GS1 Application Identifiers (AIs) should be entered using [square brackets] notation. These will be converted to (round brackets) when the value is shown.
Channel
|
|
OneCode
Notes: Input data consists of a 20 digit tracking code, followed by a dash (“-“), followed by a delivery point zip-code which can be 0, 5, 9 or 11 digits in length.
Code16K and Code49
|
|
PDF417, PDF417Trunc and HIBCPDF417
|
|
|---|---|
|
|
MicroPDF and HIBCMicroPDF
|
|
DataMatrix
|
| |
|---|---|---|
|
| |
|
| |
|
|
Note: If no size is entered or the data does not fit in the entered size then the size is adjusted automatically.
QRCode
|
| |
|---|---|---|
|
| |
|
| |
|
Note: If no size is entered or the data does not fit in the entered size then the size is adjusted automatically.
MicroQR
|
|
MaxiCode
|
|
Note: Modes 2 and 3 require a primary and secondary value. The value is divided into a primary and secondary value by a newline character (“\n”). The primary value required format is 9 digits for mode 2 and 6 alpha numeric characters for mode 3 of post code data (the remaining characters should be filled with spaces), followed by a 3 digit country code (ISO3166), followed by a 3 digit service code depending on your parcel courier.
Aztec
|
| |
|---|---|---|
|
| |
|
| |
|
|
Note: If no size is entered or the data does not fit in the entered size then the size is adjusted automatically.
CodeOne
|
|
|---|---|
| |
|
|
Note: If no size is entered or the data does not fit in the entered size then the size is adjusted automatically.
GridMatrix
|
|
|---|---|
| |
|
|
|
Note: If no size is entered or the data does not fit in the entered size then the size is adjusted automatically.
Composite Barcodes
|
|
|---|---|
|
Note: Composite barcodes require a primary and secondary value for the linear and 2D component respectively. The value is divided into a primary and secondary value by a newline character (“\n”).
HTML/RTF Format
|
|
|---|---|
|
|
Boolean Format
Booleans fields have no additional optional formatting.
Note: All optional formatting are not case sensitive. For example: “HTML” and “html” refer to the same optional formatting.
Compile the template.
Create the .DOCX file.
Copy and run the code below.
from docxfactory import WordProcessingMerger from datetime import datetime try: merger = WordProcessingMerger.get_instance() start_time = datetime.now() merger.load("/opt/DocxFactory/exercises/templates/special_fields.dfw") merger.set_clipboard_value("Account", "Account", "12345678901") merger.set_clipboard_value("Account", "Active", "no") merger.set_clipboard_value("Account", "CustomerPic", "/opt/DocxFactory/exercises/images/customer1.png") merger.set_clipboard_value("Account", "Comments", "<h3>An unordered list:</h3>" + "<ul>" + "<li>List item</li>" + "<li>List item</li>" + "<li>List item</li>" + "</ul>") merger.paste("Account") merger.save("/tmp/special_fields.docx") print("Completed (in", round((datetime.now() - start_time).total_seconds(), 3), "seconds).") exception Exception as e: print(str(e)) |
The code sets the value for all the special field types:
Picture fields are set with a string value of the image file path.
Note: Relative paths are resolved relative to the current working directory. For example: “dir/image.jpg” is resolved to “[working directory]/dir/image.png”.
Note: The picture inserted as a place holder is only used to define the picture field in the template. In fact, the picture is removed when compiling the template, leaving the place holder blank. If the picture field is not set when creating a new document then no picture is inserted in the place holder and the picture field remains blank.
Note: DocxFactory does not support images in compatibility mode on purpose because of their many drawbacks, most notably .DOCX files with even a hundred images may take many minutes and even more to open. To find if the .DOCX file is in compatibility mode, check if the title bar displays [Compatibility Mode]. To remove compatibility mode, select Save as from the menu, Word Document and in the Save as dialog-box make sure the Maintain compatibility with Word 97-2003 checkbox is not selected.
Note: In most cases, the image files are saved inside the .DOCX file (also called embedded images) but it is also possible to save only the image files URL instead (also called linked images) to reduce the .DOCX file size but if the .DOCX file is opened on a network with no access to the image files then the images will not be displayed. DocxFactory uses embedded images by default. To use linked images pass an image file “file://<host>/<directory>/<file>” URL instead. It is recommended to use embedded images. Use linked images only when necessary.
Barcode fields are set with a string value to display as a barcode.
HTML/RTF field are set with a string value of the HTML or RTF.
Note: The HTML “<html><body></body></html>” tags (including DTD and other headers) or the RTF “{\rtf1\ansi\deff0}” definitions are optional. If they are missing then DocxFactory will add them automatically.
Note: Similar to picture fields, DocxFactory automatically embeds <img src=“<file>”> tag image files into the document so the document can be sent out and the images can still be displayed. To force DocxFactory to use linked images, enter an “http://<host>/<directory>/<file>” or “file://<host>/<directory>/<file>” URL.
Boolean fields are set with a number value of 0 or string value of “0”, “0.0”, “no”, “false” for no and all other values for yes.
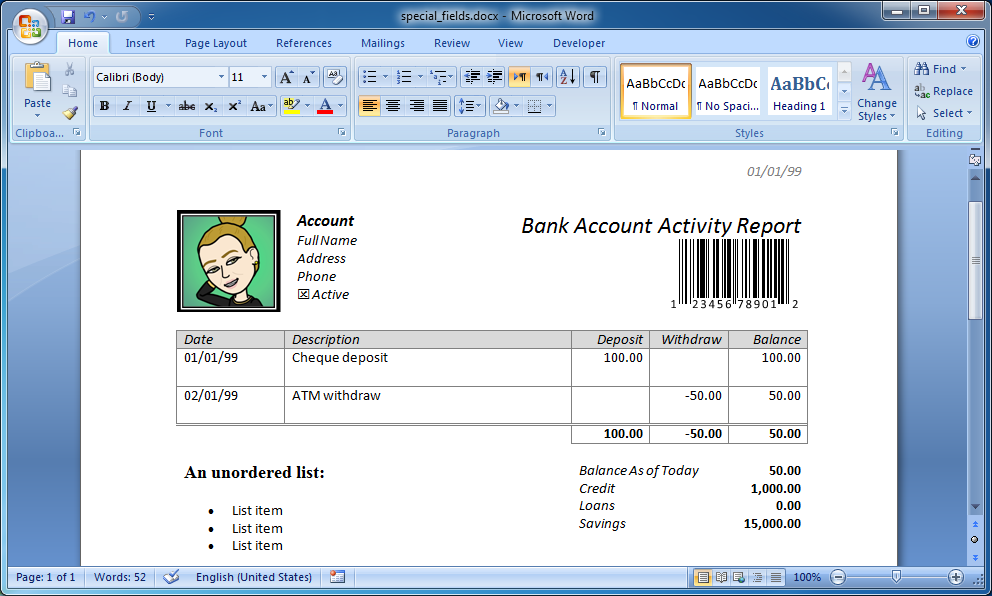
Open the created .DOCX file (see picture below).
Barcodes 1 Exercise
The following exercise creates a document with sample barcodes.
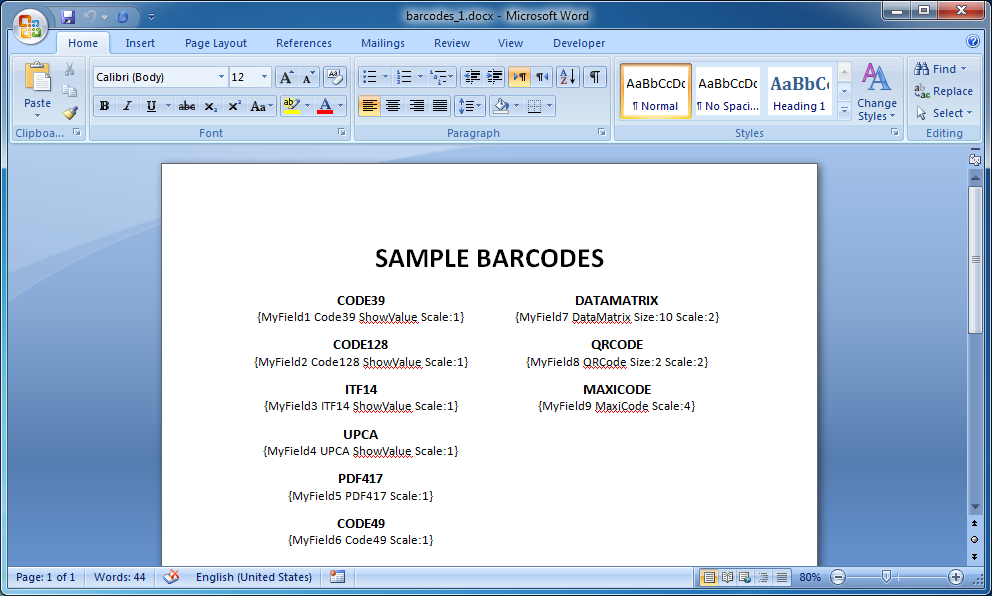
Open barcodes_1.docx in the DocxFactory/exercises/templates/ directory (see picture below).
Compile the template.
Create the .DOCX file.
Copy and run the code below.
from docxfactory import WordProcessingMerger from datetime import datetime try: merger = WordProcessingMerger.get_instance() start_time = datetime.now() merger.load("/opt/DocxFactory/exercises/templates/barcodes_1.dfw") merger.set_clipboard_value("Main", "MyField1", "12345678901") merger.set_clipboard_value("Main", "MyField2", "12345678901") merger.set_clipboard_value("Main", "MyField3", "12345678901") merger.set_clipboard_value("Main", "MyField4", "12345678901") merger.set_clipboard_value("Main", "MyField5", "Hello World") merger.set_clipboard_value("Main", "MyField6", "Hello World") merger.set_clipboard_value("Main", "MyField7", "Hello World") merger.set_clipboard_value("Main", "MyField8", "Hello World") merger.set_clipboard_value("Main", "MyField9", "Hello World") merger.paste("Main") merger.save("/tmp/barcodes_1.docx") print("Completed (in", round((datetime.now() - start_time).total_seconds(), 3), "seconds).") exception Exception as e: print(str(e)) |
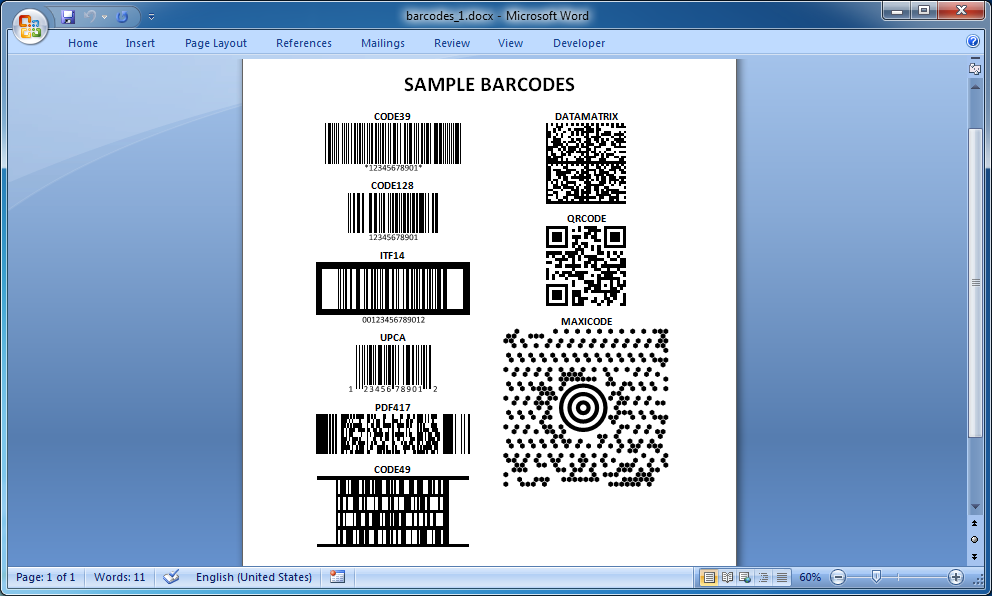
Open the created .DOCX file (see picture below).
Barcodes 2 Exercise
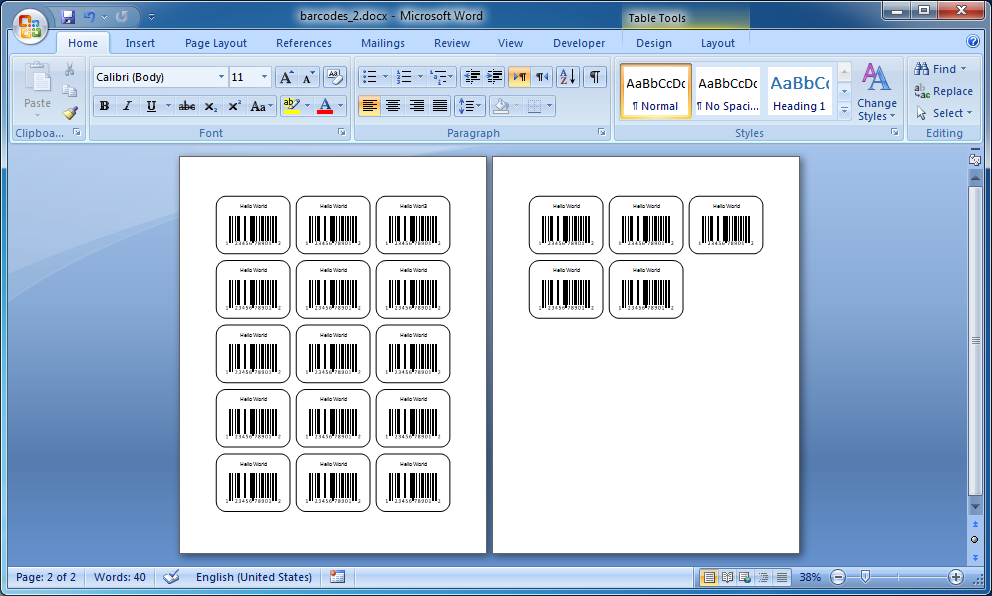
The following exercise creates a document for printing stickers.
Open barcodes_2.docx in the DocxFactory/exercises/templates/ directory.
Open the Bookmark dialog box and go through and highlight the bookmarks (see picture below).
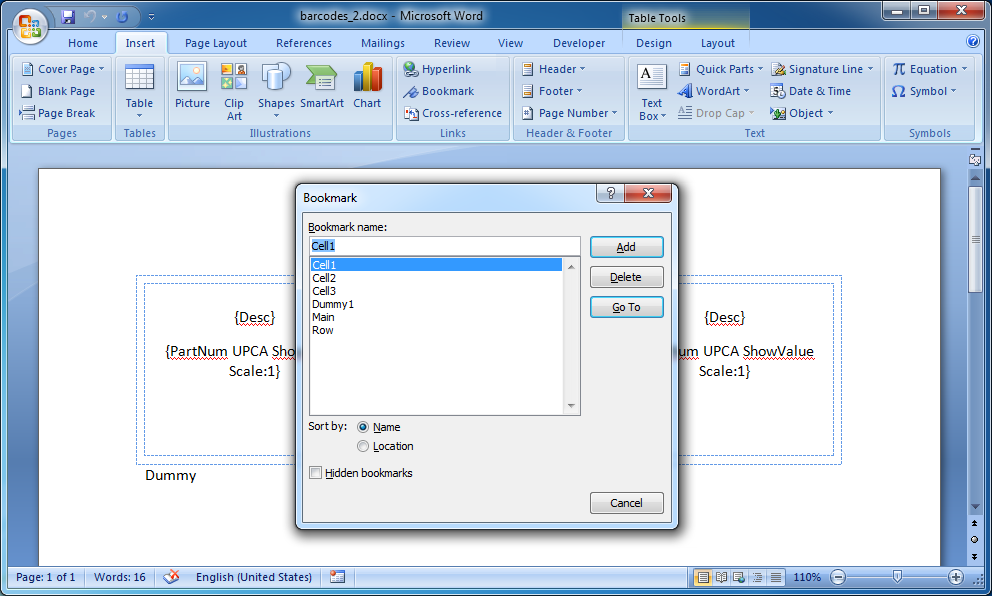
The template has a Row and Cell items like a table and you can paste the Row and Cell items like you would for creating a table. There is also a Main top level item because if the Row item was a top level item then it would start in a new page every time it was pasted and a dummy item which is never pasted and its only purpose is to help differentiate between the Row and Main items.
Draw a rounded rectangle over the first Cell item.
Place the cursor before “{Desc}” field. Select rounded rectangle from the Shapes drop down menu in the Insert ribbon and draw a rounded rectangle over the first cell item (see picture below).
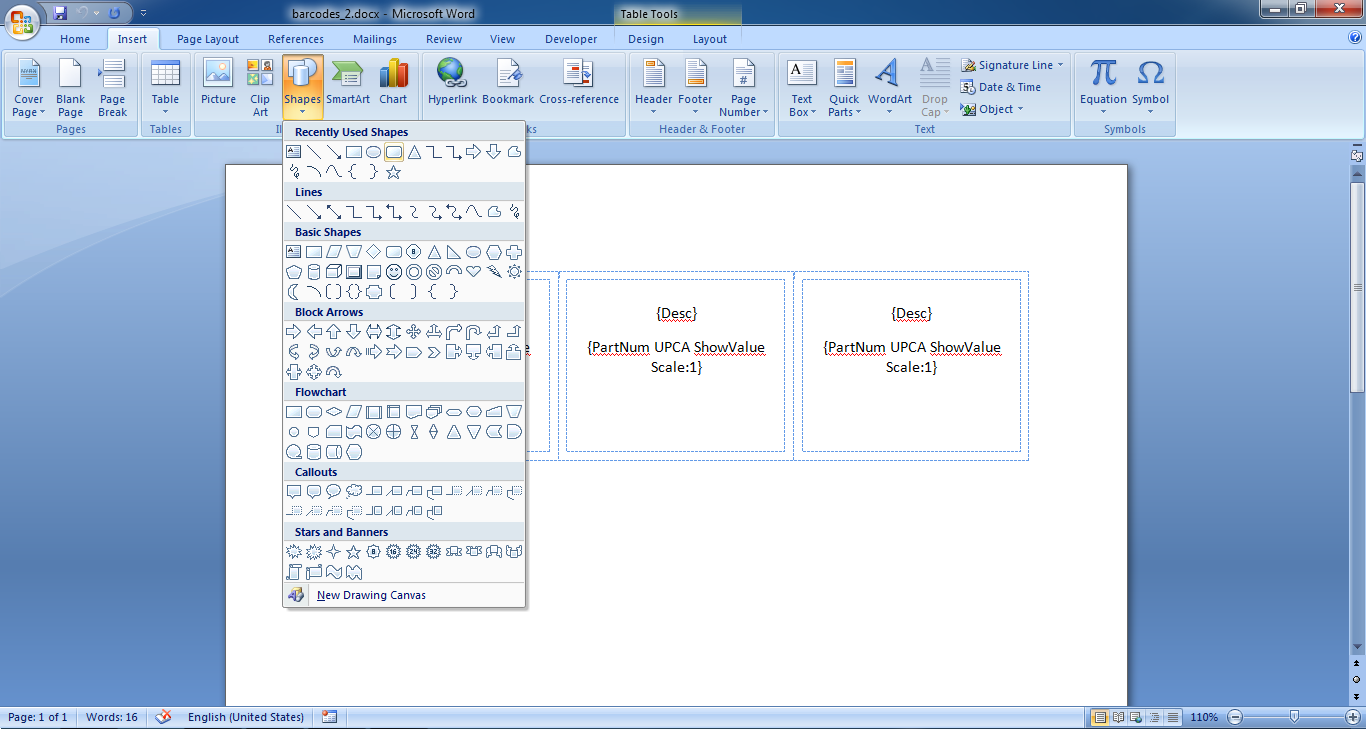
Position the rounded rectangle.
Right click the rounded rectangle and select Format AutoShape from the drop down menu. Click the Advanced button in the Layout tab. Set Horizontal Alignment: Left relative to: Left Margin and Vertical Alignment: Top relative to: Top Margin in the Picture Position tab and Select Layout in table cell (see picture below).
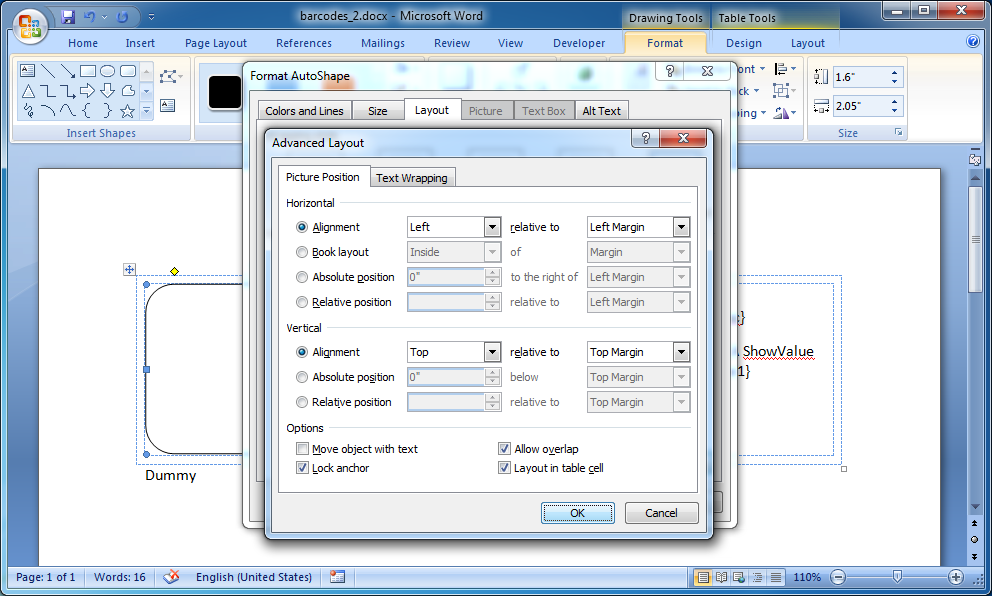
Set the rounded rectangle size.
Select the Size tab in the Format AutoShape dialog box. Set the Height to Absolute: 1.6" and Width to Absolute: 2.05" (see picture below).
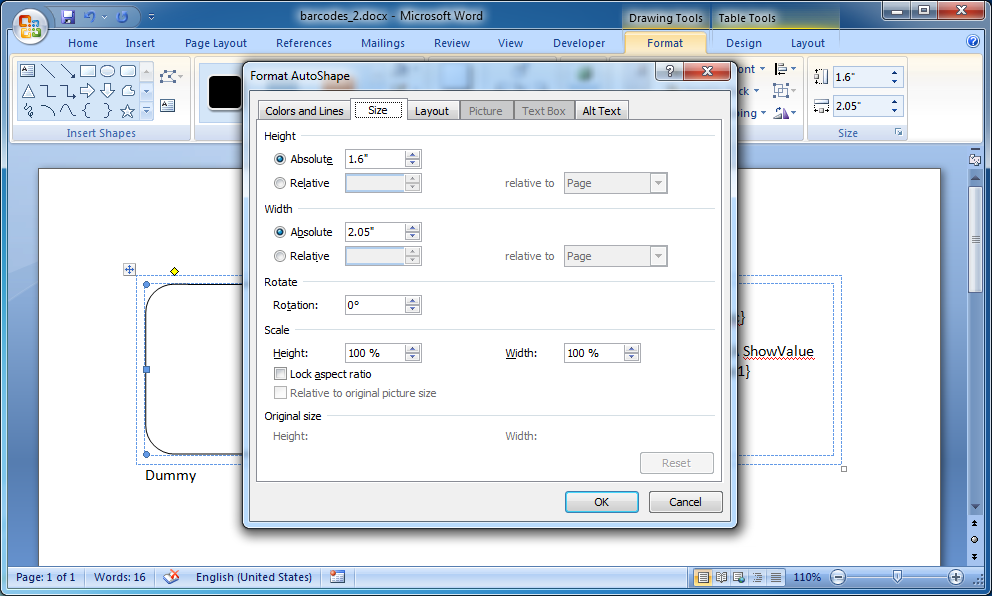
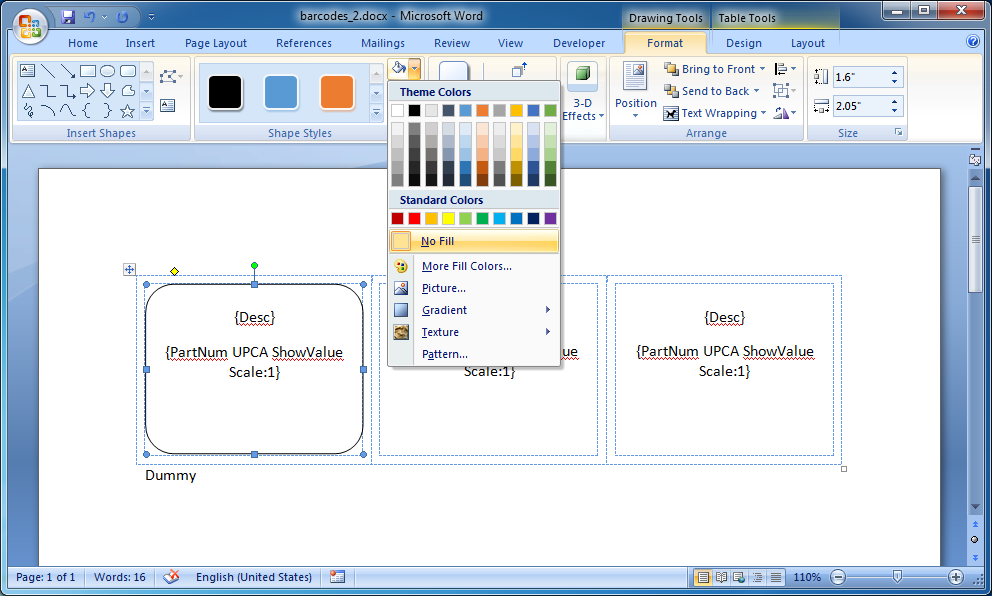
Remove the rounded rectangle fill color and keep only the shape outline.
Select No Fill in the Fill drop down menu in the Format ribbon (see picture below).
Repeat steps 2 to 5 for the second and third Cell items.
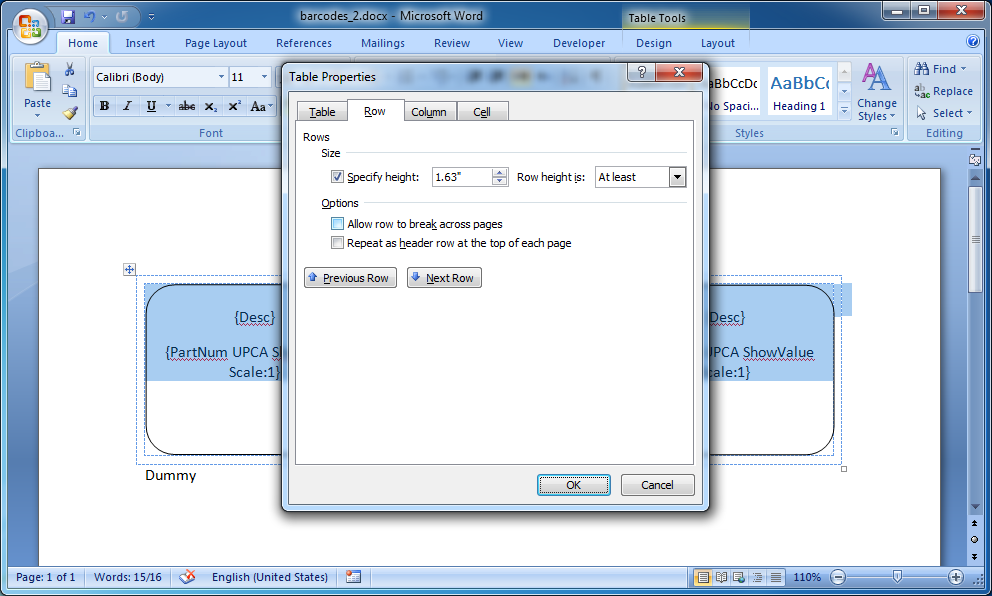
Unselect the Allow row to break across pages for the Row item so either the entire row fits in the page or the row is moved to the next page.
Select the Row bookmark from the Bookmarks dialog box. Right click the highlighted area and select Table Properties from the drop down menu and unselect the Allow row to break across pages in the Row tab (see picture below).
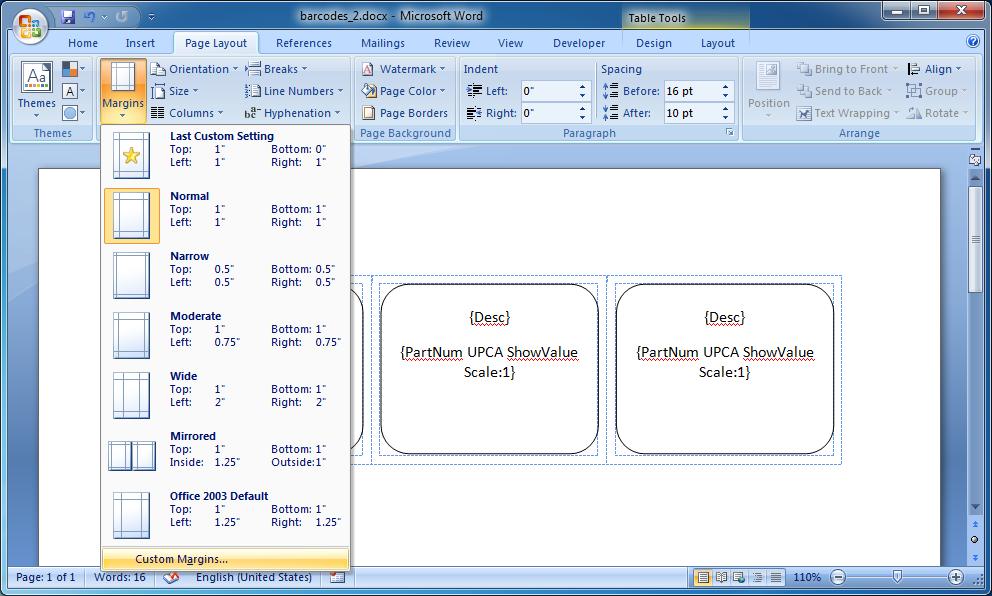
Remove the page bottom margin. Word adds a paragraph after a table. If the table fills the page then the paragraph will overflow adding an empty page. You can remove or shorten the page bottom margin to make space for the paragraph.
Select the Custom Margins from the Margins drop down menu in the Page Layout ribbon. Set the Bottom Margins: 0" in the Margins tab (see picture below).
Compile the template.
Create the .DOCX file.
Copy and run the code below.
from docxfactory import WordProcessingMerger from datetime import datetime try: merger = WordProcessingMerger.get_instance() start_time = datetime.now() merger.load("/opt/DocxFactory/exercises/templates/barcodes_2.dfw") merger.paste("Main") for i in range(20): j = (i + 1) % 3 if (j == 0) j = 3 if (j == 1) merger.paste("Row") merger.set_clipboard_value("", "Desc", "Hello World") merger.set_clipboard_value("", "PartNum", "12345678901") merger.paste("Cell" + str(j)) merger.paste("Main") merger.save("/tmp/barcodes_2.docx") print("Completed (in", round((datetime.now() - start_time).total_seconds(), 3), "seconds).") exception Exception as e: print(str(e)) |
Open the created .DOCX file (see picture below).
